আমার পঠিত ব্লগ সমুহ

My collections লেবেলটি সহ পোস্টগুলি দেখানো হচ্ছে৷ সকল পোস্ট দেখান

বৃহস্পতিবার, ১৪ জুন, ২০১২

গ্রামীনফোন,বালালিংক,এয়ারটেল,সিটিসেল,টেলিটক,রবি-মোবাইল ইতিহাস ও বাংলাদেশের মোবাইল অপারেটরের সমস্ত চলমান সমাধান(অল টাইম আপডেট)“ফ্রী”জেনে নিন


  • মোবাইল ফোন তারবিহীন টেলিফোন বিশেষ। মোবাইল (mobile) অর্থাৎ "স্থানান্তরযোগ্য", এই ফোন সহজে যেকোনও স্থানে বহন করা এবং ব্যবহার করা যায় বলে মোবাইল ফোন নামকরণ করা হয়েছে। এটি ষড়ভূজ আকৃতির ক্ষেত্র বা এক-একটি সেল নিয়ে কাজ করে বলে একে "সেলফোন" (cell phone) নামেও পরিচিত।

ফোনেরউদ্ভাবক:

  • মোটোরোলা কোম্পানিতে কর্মরত ডঃ মার্টিন কুপারকে মোবাইল ফোনের উদ্ভাবকের মর্যাদা দেয়া হয়ে থাকে। তিনি ১৯৭৩ সালের এপ্রিলে প্রথম সফল ভাবে এই ফোনের মাধ্যমে কল করতে সক্ষম হন।
  • বাংলাদেশে টেলিকম কোম্পানী লিমিটেড এর একটি যৌথ প্রয়াস।  বাংলাদেশে মোবাইল ফোন প্রথম চালু হয় ১৯৯৩ সালের এপ্রিল মাসে। Hutchison Bangladesh Telecom Limited (HBTL) ঢাকা শহরে AMPS মোবাইল প্রযুক্তি ব্যবহার করে মোবাইল ফোন সেবা শুরু করে এবং ক্রমান্বয়ে সারাদেশে নেটওয়ার্ক বিস্তৃত করে। বর্তমানে দেশের ৬৪ টি জেলার মধ্যে মোবাইল ফোন সেবা প্রদানের জন্য অনুমোদিত ৬৪ টি জেলাতেই মোবাইল ফোন এর নেটওয়ার্ক রয়েছে।এছাড়াও মোবাইল অপারেটর গুলো এসএমএস, ভয়েস এসএমএস, এসএমএস পুশ-পুল সার্ভিস, ভিএমএস, ফ্যাক্স এবং ডাটা সার্ভিস, ওয়েলকাম টিউন, রিংব্যাক টোন, মিসড কল এলার্ট প্রভৃতি সেবা প্রদান করে থাকে।সম্প্রতি এটি তার গ্রাহকদের জন্য ইডিজিই বা এ্যাজ সেবা চালু করেছে যার ফলে বাংলাদেশের প্রত্যন্ত অঞ্চলের মানুষজনও ইন্টারনেটের পূর্ণাঙ্গ সুবিধা পাচ্ছে।
  • বর্তমানে বাংলাদেশে মোট ৬টি মোবাইল ফোন কোম্পানী রয়েছে। এদের মধ্যে ৫টি জি.এস.এম এবং একটি সি.ডি.এম এ প্রযুক্তির মোবাইল সেবা দিচ্ছে। মোবাইল কোম্পানীগুলো হল:
  • সিটিসেল (সিডিএমএ)
  • রবি (পূর্ব নাম একটেল)
  • গ্রামীনফোন
  • বাংলালিংক (সেবাওয়ার্ল্ডকে কিনে নেয়)
  • টেলিটক
  • এয়ারটেল (ওয়ারিদকে কিনে নেয়)

এখন আলাপ করা যাক-:

সমস্ত চলমান সমাধান
(All mobile solution)

বিভাগ=1

  • ইন্টারনেট :
  • আপনার মোবাইলে সক্রিয় GPRS (বাংলাদেশের জন্য)
  • #আপনার চলমান ডিভাইস আপনাকেতে ইন্টারনেট ব্যবহার করতে আপনার চলমানে GPRS সক্রিয় করতে হবে।
  • Requirements:
  • ১। একটি GPRS/EDGE mobile/PDA
  • ২। সমর্থন করে একটি SIM (গ্রাহক পরিচয় মডিউল) একটি চলমান অপারেটর উদাঃ Grameen ফোন, Aktel, Banglalink, Teletalk অথবা Warid Telecomএর কার্ড।
  • ৩। ন্যুনতম পরিমাণ।

Activation:

গ্রামীনফোন

  • Wright এবং ৮০৮০তে তে এইটি পাঠান। PIN ১২৩৪এর সঙ্গে সমস্ত উত্তর এসএমএস সংরক্ষণ করুন। কিছু handsets SMS-based মানসমূহ সমর্থন করে না যেটি নিজে হাতে মানসমূহের মধ্য দিয়ে হ কনফিগার করেতে প্রয়োজন বোধ করে।

সহায়িকা WAP মানসমূহ:

  • Profile/Settings নাম = GP-WAP
  • APN (উপলব্ধি করা পয়েন্ট নাম) = gpwap
  • গেটওয়ে (প্রক্সি) আই.পি. = 10 .128 .1 .2
  • গেটওয়ে (প্রক্সি) পোর্ট = ৮০৮০
  • হোমপেজ = এইচটিটিপি://wap.gpworld.com
  • ডেটা বাহক = GPRS
  • Manual Internet Settings:
    Profile/Settings Name = GP-INTERNET
    APN (Access Point Name) = gpinternet

রবি

  • Robi GPRS মসলা হিসেবে পরিষেবা জানা হয়। আপনার GPRS সক্রিয় করতে দুই পদ্ধতি আছে (MMS এবং ইন্টারনেট চাকরি ও)।

  • 1. Dail *140*7# or visit http://gprs.aktel.com/ and the follow the instructions.
বা,
  • 2. Type "*#06#" to see the IMMI number of your handset.
    For example, let your IMMI no is 350143304709722. Write the first 8 digit down of your IMMI number e.g.35014330.
  • Now go to your Message menu and write a sms as follows:
    -> For WAP settings: wap 35014330
    -> For MMS settings: mms 35014330
    -> For Internet settings: web 35014330
    and send* it to 8738

এয়ারটেল

  • যদি আপনি প্রথম বার এইটি একটি handset কনফিগারেশন অনুরোধের জন্য আপনার চলমান ডিভাইসের দিকে এয়ারটেল SIM সয়ংক্রিয়ভাবে ভিতরে ঢোকান তারপর চালু করণেন। যদি আপনি এইটি গ্রহণ করেন তারপর একটি ফ্ল্যাশ এসএমএস একটি অল্প মিনিটের মধ্যে উপস্থিত হবেন। মাত্র মুক্ত এবং আপনার চলমানে মানসমূহ সংরক্ষণ করুন। তারপর আপনার handset GPRS/EDGEএর জন্য সয়ংক্রিয়ভাবে কনফিগার করা হবে। ইন্টারনেট বিশ্ব এখন ব্রাউজ করেন।

  • If the automative sms does not arrive then,
  • -> Go to এয়ারটেল Menu
  • -> Select Self Service
  • -> Select Multimedia Settings
  • -> Select Reset Settings
  • Then you are requested to send a sms. Select YES or Send.
  • You will soon receive a flash message with the handset settings and this must be saved in your handset by clicking on “YES”.

বাংলালিংক

  • আপনাকে banglalink GPRSএর জন্য আপনার চলমান নিজহাতে কনফিগার করতে হবে। ১২১তে মাত্র ডাক দেয় এবং গ্রাহক যত্ন চাকরির একটি প্রতিনিধির সঙ্গে যোগাযোগ।

  • ইন্টারনেট মানসমূহ নিজহাতে:
  • বৃত্তান্ত নাম: blweb
  • APN: blweb
  • প্রোটোকল: http Wap
  • বৃত্তান্ত নাম: blwap
  • APN: blwap
  • Proxy/Gateway ঠিকানা: 10. 10 .55. 34 অথবা 010. 010 .055 .034
  • পোর্ট: ৮৭৯৯
    Protocol: http

টেলিটক

  • GPRS সক্রিয় করতে পরিষেবায়। 'reg' অথবা unl লেখুন [অসীম ব্যবহারের জন্য] এবং ১১১তে এসএমএস পাঠান। It’ll ৭২ ঘন্টার মধ্যে সক্রিয় করা হয় এবং আপনাকে ঘোষণা করা হবে। তারপর GPRS ব্যবহার করার জন্য আপনার চলমান handset কনফিগার করুন:

  • APN: wap (নিয়মিতের জন্য) অথবা gprsunl (অসীমের জন্য)
  • আই.পি.: 192 .168. 145 .101
  • পোর্ট: ৯২০১


বিভাগ=2

জিপি ইন্টারনেট মোডেমে অন্য একটি মোবাইল অপারেটর ইন্টারনেট Sim ব্যবহার করুন.

  • আপনি জানেন যে GrameenPhone ইন্টারনেট মোডেম জিপি ইন্টারনেট মোডেমে অন্য একটি চলমান অপারেটর Sim ব্যবহার করতে জিপি ইন্টারনেট মোডেম, কিন্তু আজ আমি একটি নতুন পদ্ধতিতে ডিফল্ট জিপি ইন্টারনেট ব্যবহারটি অন্য একটি মোবাইল অপারেটর Simএর সঙ্গে মানসমূহ জন্য don`tন ব্যাখ্যা করে এবং Grameenphone ইন্টারনেট মোডেমে যেকোন চলমান অপারেটর ইন্টারনেট উপভোগ করুন। আসুন পরীক্ষা করি জিপি মোডেমে অন্য একটি মোবাইল অপারেটর Sim ব্যবহার করতে হয় কিভাবে।

আপনার পিসির সঙ্গে :

GP ইন্টারনেটেরজন্য:

  • Connect GP Internet Modem with your PC Then GP internet Modem Default Software will Open.
  • Go To Tools -->Options-->Profile Management.
  • By Default GP-INTERNET Profile name have been selected.
  • Now Select New From Right Side panel.

Robi ইন্টারনেটেরজন্য:

  • Profile Name: Robi-INTERNET
  • APN Static/APN : internet Access
  • Number:*99***1# Now Enter your Robi Sim Then Select Profile Name Robi-INTERNET Then Click Connect From GP Modem software.

এয়ারটেল ইন্টারনেটের জন্য.

  • Profile Name: Warid-INTERNET
  • APN Static/APN : internet Access
  • Number:*99***1# Now Enter your Warid Sim Then Select Profile Name Warid-Internet Then Click Connect From Gp Modem software.

Banglalink ইন্টারনেটের জন্য:

  • Profile Name: Banglalink-WEB
  • APN Static/APN : blweb Access
  • Number:*99***1#
  • Now Enter your Banglalink Sim Then Select Profile Name Banglalink-web Then Click Connect From Gp Modem software.

Teletalk ব্যবহারকারীর জন্য:

  • Service Type =No Use No Pay
    APN= wap
    IP =192.168.145.101
    Port= (optional) 9201
  • Service - Monthly/Daily Unlimited
    APN =gprsunl
    IP =192.168.145.101
    Port =(optional) 9201 Done ,now you can use any Operator Sim in your GP Internet Modem.

সিটিসেল ব্যবহারকারীর জন্য:

  • All Citycell One, and Citycell One 85 subscribers can migrate to this new price plan by writing Y to 4567 SMS at free of cost.
  • 60 sec. pulse applicable.
  • Tk. 0.20 call setup charge is applicable for Citycell to Citycell, Citycell to other operator and FnF calls in first minute.
  • Upon first successful recharge of Tk. 50 scratch card subscriber will receive Tk. 25 bonus talk time and 500 on-net free SMS with 5 days validity instantly. Rest Tk. 350 will be disbursed in 7 equal installments i.e. Tk. 50 upon recharge of Tk. 100 with 5 days validity each.
  • All bonus talk time is usable for on-net calls only with Tk. 1.50/min + 15% VAT.
  • 100 MB free data will be given on activation to all new connections only with 5 days validity. To activate this offer type 100 and send to 9666 (port charge free). Subscribers must require to activate this offer before subscribing to any other data plan.
  • Free SMS can be checked through *887. Free data usage can be check by writing usage to 811.
  • All permanently disconnected subscribers will avail the Citycell One new price plan only from the commercial date onwards.
  • 15% VAT applicable in all tariff mentioned above.
Bonus features:
MOBIDATA / HUAWEI/ সোনি /GP এবং সমস্ত অন্যান্য মোডেম ইন্টারনেট মানসমূহ:
  • Profile name: A s you wish e.g. Marsus
    Dial no:    *99# or *99***1#
    User name:  Blank
    Password:  Blank
    APN: See the apn list from above.
  • (For mobidata go settings>Connection profile>Add>New profile> ... That's all)

বিভাগ=3

Different operator Power menu(all info)

  • গ্রামীনফোন:  *111#
    রবি: *140#
    বাংলালিং: *789#
    এয়ারটেল: Airtel menu

বিভাগ=4

Account balance

NetworkDial (For checking balance)
গ্রামীনফোন*566# [Prepaid]12115 [Postpaid]sms: 2000 [Postpaid]
বাংলালিংক*124#
এয়ারটেল*778#
রবি*222# or *222#1 or 222
টেলিটক*152#
সিটিসেল*8111

বিভাগ=5

সাহায্য(Helpline)

NetworkDial
গ্রামীনফোন121
বাংলালিংক123
এয়ারটেল787
রবি123 or sms to 8123
টেলিটক1234
সিটিসেল121

বিভাগ=6

বন্ধু এবং পরিবার সংখ্যা (Friends and family numbers)

''F&F Procedures''

গ্রামীনফোন:

Value added FeaturesServicesSMS FormatSend to
F&FActivation0171XXXXXXX0171XXXXXXX0171XXXXXXX2888
ChangeOld No New No2888
To ViewF&F or FnF2888
  • F&F সংখ্যা প্রতি ৩০ দিন পরিবর্তন করা যাবে (হাসি, Djuice & Xplore.Subscribers)Postpaidএর জন্য প্রযোজ্য: ২৮০০

এয়ারটেল

আপনার বন্ধু & পরিবার সংখ্যা যোগ করতে, আপনার handsetতে এয়ারটেল মেনু থেকে নিচে সহজ ধাপ মাত্র অনুসরণ করে:

  •  বন্ধু এন পরিবার মেনু নির্বাচন করে :To add an FnF number, select “Add a Number” and then enter your desired mobile number.
  • #আপনি একটি এসএমএস বিজ্ঞপ্তি confirming আপনার FnF শীঘ্রই সদ্যঃ গ্রহন করবেন যোগ করবেন।
  • #আপনার SIM জিনের ভেতরে FnF মেনু মুছে ফেলতে আপনাকে ও অনুমোদন করে, প্রতিস্থাপন করুন এবং FnF সংখ্যার আপনার তালিকা দেখুন, আপনার keypadএর একটি অল্প সহজ ক্লিকের মধ্য দিয়ে -
  • একটি FnF সংখ্যা মুছে ফেলতে, “Delete একটি Number” এবং নির্বাচন করুন তারপর একটি FnF সংখ্যা প্রতিস্থাপন করতে চলমান সংখ্যা ।
  • “Replace একটি Number” এবং নির্বাচন করুন তারপর সমস্ত আপনার FnF সংখ্যা “List FnF Numbers” দেখতে চলমান সংখ্যা । নির্বাচন করুন।

রবি

১। ডায়াল *১৪০#, ‘FnF & Partner’ নির্বাচন করুন এবং নির্দেশাবলী তারপর ২ অনুসরণ করুন। ৮৩৬৩তে এসএমএস (৮fnf) অনুসরণ করে হিসেব:

To

SMS Format

Example

Add FnF numbersaddFnF numbers
**(if you want to enter multiple numbers leave space between them)
add 018xxxxxxxx 017xxxxxxxx 019xxxxxxxx
Add Partner numberPPartner NumberP 018xxxxxxxx
Delete FnF and Partner numberdelnumber to be deleteddel 018xxxxxxxx
To see current FnF and Partner list and statusFnF
To know about the whole processHelp
Notes: · ৩ সংখ্যার সর্বোচ্চ FnF থেকে ১ এসএমএস
• সর্বোচ্চ ১ সংখ্যার সঙ্গে সঙ্গী হিসেবে ১ এসএমএস
• সর্বোচ্চ ১ সংখ্যার সঙ্গে FnF হিসেবে মুছে ফেলা হয় যোগ করা,যোগ করা যাবে এবং ১ এসএমএসের সঙ্গে সঙ্গী তালিকা প্রত্যেক FnF •সর্বোচ্চ সংখ্যা ১৫days
• এসএমএস আধান প্রযোজ্যের পরে পরিবর্তন করা যাবে।

বাংলালিংক:

*789#

টেলিটক

Prepaid:
  • Write ADD 0155XXXXXXX 02XXXXXX 017XXXXXXXX and send SMS to 363.
Postpaid:
  • FADD 0155XXXXXXX 0155XXXXXXX 0155XXXXXXX 0155XXXXXXX 0155XXXXXXX and send SMS to 363.

বিভাগ=7

গ্রাহক সম্পর্ক আধিকারিকের সঙ্গে যোগাযোগ (insta.service)

গ্রামীনফোন
ইমেল:insta.service@grameenphone.com
ওয়েব: http://www.grameenphone.com
Direct Chat: https://ic-web.grameenphone.com/ 
ফোন সংখ্যা:01710000600
একই simএর সঙ্গে চলমান থেকে:121
যেকোন ফোন থেকে: 9882990
Fax: 9882948
বাংলালিংক
ইমেল: info@banglainkgsm.com
ওয়েব:http://www.banglainkgsm.com
ফোনসংখ্যা: ০১৯১১৩০৪১২১
একই simএরসঙ্গেথেকে: ১২১
যেকোনফোনথেকে: +৮৮০১৯১৩১০৯০০-৯০১
Fax: 089888370-1
এয়ারটেল
ইমেল:customerserice@bd.airtel.com
ওয়েব: http://www.bd.airtel.com
ফোনসংখ্যা:8801678600786
একই simএরসঙ্গেথেকে: 786
যেকোনফোনথেকে: +8801678600786
রবি
ইমেল: 123@robi.com.bd
ওয়েব: www.robi.com.bd
ফোনসংখ্যা:01819 400400
একই simএরসঙ্গেথেকে: 121
যেকোনফোনথেকে:+8801819234329-01819234333
Fax to +88 02 8832503
টেলিটক
ওয়েব: www.teletalk.com.bd
ফোনসংখ্যা: 9882585-ext-333 0155-0157750/60
Recharge কার্ড:
Dial *151*13 digit PIN #
সিটিসেল
ওয়েব: www.citycell.com
ফোনসংখ্যা: 011 99 121 121

শুক্রবার, ৮ জুন, ২০১২

Sample Tables


  • Example 1A - SOURCE CODE (first table row contains only one cell)

    <table border="3" bordercolor="#c86260" bgcolor="#ffffcc" width="50%" cellspacing="5" cellpadding="3">

    <tr><td>MY DAILY MENU</td></tr>

    <tr><td valign="top"><b>Breakfast</b></td><td>Orange juice<br>Toast<br>Black coffee</td></tr>

    <tr><td valign="top"><b>Lunch</b></td><td>Tuna sandwich<br>Apple</td></tr>

    <tr><td valign="top"><b>Dinner</b></td><td>Hamburger steak<br>Mashed potatoes<br>Green beans<br>Jello</td></tr>

    </table>

    Example 1A - RESULT (first table row contains only one cell)
    MY DAILY MENU
    BreakfastOrange juice
    Toast
    Black coffee
    LunchTuna sandwich
    Apple
    DinnerHamburger steak
    Mashed potatoes
    Green beans
    Jello
    <~Missing table cell


    This situation can be remedied using the colspan attribute whose value defines how many columns a table cell will span. Hence, a <td>tag using a colspan="2" attribute-value pair will specify that that particular cell will stretch over the equivalent of two columns worth of space:

    Example 1B - SOURCE CODE (cell spans two columns)

    <table border="3" bordercolor="#c86260" bgcolor="#ffffcc" width="50%" cellspacing="5" cellpadding="3">

    <tr><td align="center" colspan="2">MY DAILY MENU</td></tr>

    <tr><td valign="top"><b>Breakfast</b></td><td>Orange juice<br>Toast<br>Black coffee</td></tr>

    <tr><td valign="top"><b>Lunch</b></td><td>Tuna sandwich<br>Apple</td></tr>

    <tr><td valign="top"><b>Dinner</b></td><td>Hamburger steak<br>Mashed potatoes<br>Green beans<br>Jello</td></tr>

    </table>

    Example 1B - RESULT (cell spans two columns)
    MY DAILY MENU
    BreakfastOrange juice
    Toast
    Black coffee
    LunchTuna sandwich
    Apple
    DinnerHamburger steak
    Mashed potatoes
    Green beans
    Jello

    Note that, as well as using colspan="2" in the 'MY DAILY MENU' table cell to make it span two columns, we also usedalign="center" to center the content.
  • rowspan="number of rows" ~ The rowspan attribute works just like the colspan attribute except that you may find the situation a little more difficult to visualize when working with the source code. But once again the principle is the same. By using the rowspan attribute, you can force a table cell to span the number of rows specified by the respective value.

    In the following example, the 'MONDAY' table cell spreads over three table rows:

    Example 2 - SOURCE CODE (cell spans three rows)

    <table border="3" bordercolor="#c86260" bgcolor="#ffffcc" width="50%" cellspacing="5" cellpadding="3">

    <tr><td align="center" colspan="3">MY DAILY MENU</td></tr>

    <!-- FIRST CELL IN THIS ROW SPANS THE NEXT 3 ROWS--> <tr><tdrowspan="3">M<br>o<br>n<br>d<br>a<br>y</td><td valign="top"><b>Breakfast</b></td><td>Orange juice<br>Toast<br>Black coffee</td></tr>

    <tr><td valign="top"><b>Lunch</b></td><td>Tuna sandwich<br>Apple</td></tr>

    <tr><td valign="top"><b>Dinner</b></td><td>Hamburger steak<br>Mashed potatoes<br>Green beans<br>Jello</td></tr>

    </table>

    Example 2 - RESULT (cell spans three rows)
    MY DAILY MENU
    M
    o
    n
    d
    a
    y
    BreakfastOrange juice
    Toast
    Black coffee
    LunchTuna sandwich
    Apple
    DinnerHamburger steak
    Mashed potatoes
    Green beans
    Jello

  • Background and Border Color


    <table 
    border="number in pixels"
    bordercolor="color"
    bordercolorlight="color"
    bordercolordark="color"
    bgcolor="color">
    ...</table>

     
    Width of table border
    Table border color
    Top/left side border color
    Bottom/right side border color
    Background color
     
    You are not obliged to settle for the default color used by web browsers to draw the borders of your HTML tables. Using various attributes in the<table> tag, you can specify your table's border color and even create a simple 3D effect. You can also define your table's background color. These attributes are detailed below:


    • border="width in pixels" ~ To recap from the previous page, you can use the border attribute to specify the width of your table's border in pixels. The number of pixels desired for the width is used as the value.
    • bordercolor="color definition*" ~ The bordercolor attribute can be used to define the color of your table's border. You may use anylegal color definition as the value. The final effect on your web page will vary from browser to browser. Internet Explorer will use your selected color to display one solid colored frame around your table. Gecko-based browsers, such as Firefox, will create a 3D lighting effect using a light version of your color on the top and left sides and a dark version of your color on the bottom and right sides.
    • bordercolorlight="color definition*" ~ Thebordercolorlight attribute can be used to define the border color on the top and left sides of your table. Although any legal color definition can be used as the value, the intent is to allow web authors to specify light colors in order to create a 3D lighting effect on your table's border. (This attribute is not supported in Netscape or Mozilla since thebordercolor attribute already accomodates the resulting effect.)
    • bordercolordark="color definition*" ~ Thebordercolordark attribute can be used to define the border color on the bottom and right sides of your table. Although any legal color definition can be used as the value, the intent is to allow web authors to specify dark colors in order to create a 3D lighting effect on your table's border. (This attribute is not supported in Netscape or Mozilla since thebordercolor attribute already accomodates the resulting effect.)
    • bgcolor="color definition*" ~ Using the bgcolor attribute, you can specify the background color of your table which includes the background in between table cells and background inside table cells. You may use any legal color definition as the value.

      A background color may also be applied to an individual table data cell by using the bgcolor attribute in the <td> tag. The selected background color will thus only apply to that particular cell.

      *(Please see Font Color for a description of all legal color definitions.)

    Example 1 - SOURCE CODE

    <table border="5" bordercolor="maroon" bgcolor="silver">
       <tr><td>Cell content...</td><td>Cell content...</td></tr>
       <tr><td>Cell content...</td><td>Cell content...</td></tr>
       <tr><td>Cell content...</td><td>Cell content...</td></tr>
    </table>


    Example 1 - RESULT
    Cell content...Cell content...
    Cell content...Cell content...
    Cell content...Cell content...


    Example 2 - SOURCE CODE

    <table border="5" bordercolor="#8080cc" bordercolorlight="#8080c0" bordercolordark="#400080" bgcolor="#ffffcc">
       <tr><td>Cell content...</td><td>Cell content...</td></tr>
       <tr><td>Cell content...</td><td>Cell content...</td></tr>
       <tr><td>Cell content...</td><td>Cell content...</td></tr>
    </table>


    Example 2 - RESULT
    Cell content...Cell content...
    Cell content...Cell content...
    Cell content...Cell content...
The cellspacing and cellpadding attributes are used in the <table>tag and apply to all cells in the respective table. The align and valignattributes are used in individual <td> tags and apply respectively to that particular table data cell. 

All these attributes are described in more detail below:
  • cellpadding="length in pixels" ~ The cellpadding attribute, used in the <table> tag, specifies how much blank space to displayin between the content of each table cell and its respective border. The value is defined as a length in pixels. Hence, a cellpadding="10"attribute-value pair will display 10 pixels of blank space on all four sides of the content of each cell in that table. (See Example 1)
  • cellspacing="length in pixels" ~ The cellspacing attribute, also used in the <table> tag, defines how much blank space to display in between adjacent table cells and in between table cells and the table border. The value is defined as a length in pixels. Hence, acellspacing="10" attribute-value pair will horizontally and vertically separate all adjacent cells in the respective table by a length of 10 pixels. It will also offset all cells from the table's frame on all four sides by a length of 10 pixels.

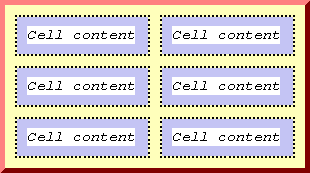
    Example 1 clearly illustrates the difference between cellpadding and cellspacing:


    Example 1 - (cellpadding="10" cellspacing="10")
    tablecells1 (3K)

    Example 1 - Legend

     
    Cell content

     
    Cellpadding

    .....
    Cell border

     
    Cellspacing


    Table border

  • align="left, center or right" ~ When the align attribute is used in a <td> tag as opposed to a <table> tag, it produces a slightly different effect. When used in a <td> tag, the align attribute will set the horizontal alignment of that respective cell's content. The value can be leftrightcenter or justify. (Please see Aligning Text for a full description of the resulting effects.)
  • valign="top, middle, or bottom" ~ The valign attribute can be used in a <td> tag to set the vertical alignment of that respective cell's content. The values that can be used are topmiddle, or bottom and will produce the following effects respectively:

    • top ~ The content is aligned flush with the top of the table cell (taking cellpadding into consideration).
    • middle ~ The content is aligned in the vertical center of the table cell (default value).
    • bottom ~ The content is aligned flush with the bottom of the table cell (taking cellpadding into consideration).

    Example 2A - SOURCE CODE (Default vertical alignment)

    <table border="3" bordercolor="#c86260" bgcolor="#ffffcc" width="50%" cellspacing="2" cellpadding="3">
    <tr><td><b>Breakfast</b></td><td>Orange juice<br>Toast<br>Black coffee</td></tr>
    <tr><td><b>Lunch</b></td><td>Tuna sandwich<br>Apple</td></tr>
    <tr><td><b>Dinner</b></td><td>Hamburger steak<br>Mashed potatoes<br>Green beans<br>Jello</td></tr>
    </table> 

    Example 2A - RESULT (Default vertical alignment)
    BreakfastOrange juice
    Toast
    Black coffee
    LunchTuna sandwich
    Apple
    DinnerHamburger steak
    Mashed potatoes
    Green beans
    Jello


    Example 2B - SOURCE CODE (valign="top" set for left-hand cells)

    <table border="3" bordercolor="#c86260" bgcolor="#ffffcc" width="50%" cellspacing="2" cellpadding="3">
    <tr><td valign="top"><b>Breakfast</b></td><td>Orange juice<br>Toast<br>Black coffee</td></tr>
    <tr><td valign="top"><b>Lunch</b></td><td>Tuna sandwich<br>Apple</td></tr>
    <tr><td valign="top"><b>Dinner</b></td><td>Hamburger steak<br>Mashed potatoes<br>Green beans<br>Jello</td></tr>
    </table> 

    Example 2B - RESULT (valign="top" set for left-hand cells)
    BreakfastOrange juice
    Toast
    Black coffee
    LunchTuna sandwich
    Apple
    DinnerHamburger steak
    Mashed potatoes
    Green beans
    Jello


<td 
width="pixels or percentage"
height="pixels or percentage">
...</td>

 
Web browsers will automatically set the dimensions of the rows and columns in your web page table according to how much content your table cells contain. Since cells are displayed in a grid-like pattern then the cell containing the most content will typically set the width and height of all cells adjacent to it and hence establish the width and height of related rows and columns in your table. 

You can, however, apply the width and height attributes to your <td> tags to explicitly set the dimensions of your table cells and thus exercise control over the width and height of rows and columns.

These attributes are described in more detail below:
  • width="pixels or percentage" ~ Using the width attribute in your<td> tags, you can explicitly set the width of your table data cells. This will have the effect of setting not only the width of that particular cell but will also set the width of the entire column in which that cell resides. You may define either a fixed width in pixels or a relative width (recommended) which is equal to a percentage of the table width.

    NOTE: In the case where the width attribute is set in more than one cell in the same column, the largest width is the one that is applied. Likewise, if the content in any table cell in that column (such as a graphic) outsizes a specified width, the width of the content will establish the width of the cell and the column it resides in.

    Example 1 below renders a table that is 500 pixels wide and has two columns. The width of the first table data cell is set to 25% which then sets the width of all the cells in Column 1 at 25% or 125 pixels (25% of 500 = 125). The width of all the cells in Column 2 default to the remainder of table's width (75%):

    Example 1 - SOURCE CODE

    <table width="500" border="5">
       <tr><td width="25%">Column 1</td><td>Column 2</td></tr>
       <tr><td>Column 1</td><td>Column 2</td></tr>
       <tr><td>Column 1</td><td>Column 2</td></tr>
    </table>


    Example 1 - RESULT
    Column 1Column 2
    Column 1Column 2
    Column 1Column 2

  • height="pixels or percentage" ~ Using the height attribute in your <td> tags, you can explicitly set the height of your table data cells. This will have the effect of setting not only the height of that particular cell but will also set the height of the entire row in which that cell resides. You may define either a fixed height in pixels (recommended) or a relative height which is equal to a percentage of the table's height.

    NOTE: In the case where the height attribute is set in more than one cell in the same row, the largest height is the one that is applied. Likewise, if the content in any table cell in that row (such as a graphic) outsizes a specified height, the height of the content will establish the height of the cell and the row it resides in.

    Example 2 renders a table that is 500 pixels wide and has two rows. The height of the first table cell in Row 1 is set to 100 pixels which then sets the height of all cells in Row 1 to 100 pixels. The height of Row 2 is not affected by the height specification in Row 1.

    Example 2 - SOURCE CODE

    <table width="500" border="5">
    <tr><td height="100">Row 1</td><td>Row 1</td><td>Row 1</td></tr>
    <tr><td>Row 2</td><td>Row 2</td><td>Row 2</td></tr>
    </table>

    Example 2 - RESULT
    Row 1Row 1Row 1
    Row 2Row 2Row 2